Testnet
The Fuji network is the official Avalanche Testnet network. It is a blockchain of the Avalanche protocol, independent from the main network (Avalanche Mainnet).
The ooNodz app has been fully deployed on this network to carry out the tests required to put its services into production, and for all operations related to maintenance and upgrading.
The testnet app is open to all users who wish to test our services before committing themselves.
All transactions on the network involve the use of fake money.
Do not attempt to import real funds from the main network to our test network. This will not work and your funds will DEFINITELY be lost!
Prerequisites
The third party tools needed are the same as those required to use the app on the Mainnet network. See the dedicated paragraph.
The only things you will have to manage are the dedicated urls and the collection of "fake" AVAX on the Avalanche Faucet.
Access Testnet network
Access Faucet to get testing money
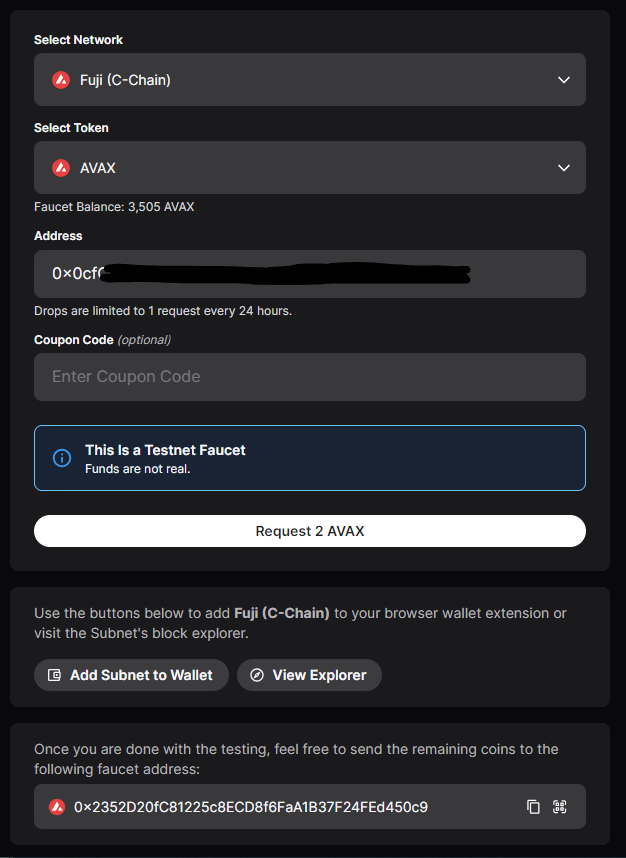
The faucet is a subnet network on the Fuji Testnet network. It provides users with fake money for testing purpose.
Once on the Faucet page, connect your wallet by clicking on the Connect Wallet Button.
If you did not added the Fuji Network to your browser wallet, you can click on the Add Subnet to Wallet button.
In the Select Token dropdown list, select the token you want to load onto your wallet, and click on the Request [AMOUNT] [CURRENCY] button.
For a proper end-to-end test, you need at least 2 AVAX and a stable coin (USDC or USDT).
You can only request USDC in the Core Faucet (2 USDC per request). You need at least 20 USDC to perform a test for the followng use case: account not subject to VAT ordering a 1 week subscription. If you want to test other use cases, you have to request more USDC.
If you don't see your stable coin balance displayed in your web3 wallet, you need to add the coin to the interface. The Add Asset to Wallet button on the faucet page allows you to do this automatically.
if you're having trouble obtaining fake USDC from the faucet, or want to test the service with fake USDT, don't hesitate to ask the team, who will be able to provide you with some.
The Avalanche protocol limits the AVAX queries to one every 24 hours for security reasons.
Once done, you can go back to the ooNodz App and start testing!
Subscribe
The service subscription process is exactly the same as that of the main network, except that you will use fake money.
Activate validation
Access your Avalanche Wallet
The former offical Avalanche wallet (Wallet.avax.network) has been officially discontinued and is no longer maintained. Users can now access all their validating and delegating needs via Core.
Navigate to https://test.core.app.
The Button displayed in your ooNodz App dashboard will take you directly to the Avalanche wallet access page.
When on the Core App home, connect your wallet. If you do not already own a Core wallet, see Getting Started.
Connect to the right network
Once on Core homepage, ensure you are connected to the testnet environment. When on testnet, an orange banner is displayed on top of the page.
To activate testnet mode, on the top right of the home page, click on the cogwheel, then switch on the Testnet Mode option.
Transfer the funds needed for staking
You only need to stake 1 AVAX to start a validation on the Fuji Network
Same process as Mainnet, except you load with AVAX your web3 wallet via the Testnet Faucet page. Then, within your web3 wallet, you proceed to a transfer of at least 1 AVAX to your Avalanche C-Chain address.
Set up and activate your validation
Same process as Mainnet.
Monitor & manage subscription
You will find all indicators you need to monitor your subscription in the App dashboard.
You can also go to the official Avascan and Avalanche Explorer to monitor your test network validations.
You can also simulate termination of service and Node ID export.

